A couple of years ago I saw Chef Dominic Palazzolo, founder and inventor of Make Your Own Molds, on Martha Stewart’s TV show talking about his silicone food-safe mold making kits and products. I was beyond intrigued and knew that someday I’d get my hot little hands on his miracle putties and spreads and make molds out of everything in sight creating edible ornamentations for cakes, cookies, and all things food!
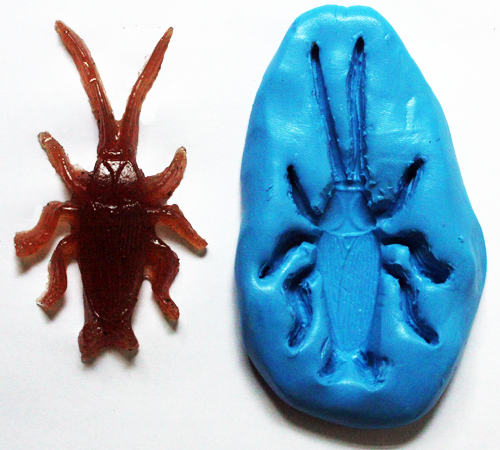
Make Your Own Molds offers three main mold making substances and they are all amazing. Silicone Plastique is a “putty” that you can impress an object into and have a cured mold in under 2 hours. I used Silicone Plastique to create the bug molds below that I shared on the Today Show and little pig molds for gummy and chocolate confections. CopyFlex is a poured liquid silicone that I used to make a big gummy pig (step by step photos here). Silicone Spread is a spreadable substance that you can apply to a 3-D object and make a mold in about 2 hours like I did from my husband and daughter’s hands for Halloween ice sculptures!
So check out MakeYourOwnMolds.com along with Chef Dominic’s instructional videos on his website and make some incredible edibles for Halloween, Easter, Christmas, baby showers, birthdays, or any occasion!
Step by Step Instructions to Make Your Own Food Grade Mold from Small Objects
Step 1: After ordering Silicone Plastique from Make Your Own Molds, check out the FAQ page to make sure that the object you want to use to create a mold meets with the tech specs. Most objects are usable from antique brooches to lace to hard rubber insects. You may have to prep the object with some of MYOM’s products, such as Seal-Dit. Some objects that contain vinyl, latex, or adhesive are not ideal. Definitely follow suggested tips for the product as Dominic is a genius who seems to have figured out every single detail to help you succeed.

Step 2: Prep your original object if necessary with Seal-Dit or Safe-D-Clay. Lay out a sheet of wax paper or a flexible cutting board on your work surface.
Step 3: Measure out equal parts of Part A and Part B of Silicone Plastique as per the Make Your Own Molds website directions or instructions that come with the product.

Step 4: Combine equal parts of Part A and Part B of Silicone Plastique until a uniform color is achieved.

Step 4: Impress the prepped object into the Silicone Plastique as per the instructions. Allow mold to cure for about 2 hours until firm and then unmold original object.

Step 5: Wash mold with hot soapy water and then immerse in boiling water for 30 seconds to sterilize mold.
Step 6: Create your food craft by filling your mold with ingredients like melted chocolate or gummy mixture to make show-stopping sweets! Click here for Gummy Bug Recipe and Instructions as seen on the Today Show.